How to Find Neutral Pelvis in Yoga (And Why It Changes Everything)
I was standing at the front of the room watching a student try to hold plank. Her arms were shaking, her lower abdomen was dipping toward the floor, and she looked like she was fighting for her life.
I walked over and gave her one simple cue about her pelvis.
Within seconds, her whole body changed. The shaking calmed down. Her core lit up on its own. She looked at me like I'd handed her a secret code.
"How did that just happen?" she asked.
That's what neutral pelvis does.
Finding neutral pelvis in yoga starts with locating two bony landmarks on your body: your hip points and your pubic bone. When these bones line up vertically (in standing), your pelvis is in its most powerful position for balance, ease of movement, and reduced forces on the low back. As a Doctor of Physical Therapy with over 25 years of clinical experience and a yoga teacher trainer, I've seen this one concept transform how people experience yoga postures, from plank to backbends and everything in between. It's not complicated. And it is a game changer! It's also one of the foundational concepts of my Balanced Posture Alignment (BPA) framework. I’ll share more on that in a bit.
In This Article:
The anatomy of your pelvis (and how to find the bones on your own body)
What anterior tilt, posterior tilt, and neutral pelvis actually mean
How to find YOUR neutral pelvis, step by step
Why neutral pelvis makes challenging yoga postures feel easier
How to apply neutral pelvis in plank (one of the most challenging postures to find it in)
What Is Neutral Pelvis (and Why Should You Care)?
You've probably heard a yoga teacher mention "neutral pelvis" or "neutral spine" at some point. Maybe you nodded along and quietly hoped nobody would ask you to explain what that means.
No shame in that. It's one of those concepts that gets tossed around a lot but rarely gets broken down in a way that actually makes sense.
Here's the simple version: neutral pelvis is the position where your pelvis is neither rotating too far forward or too far back. It's the sweet spot in the middle, and it's where your body has access to the most power, the most stability, and the most ease.
When your pelvis is in neutral, you're not working against yourself. Your muscles can do their jobs efficiently, your spine is supported, and yoga postures that used to feel like a battle start to feel more accessible. You experience improved balance and relief from back discomfort associated with excess load. Postures suddenly feel possible instead of impossible. It honestly feels like magic sometimes.
But it's not really magic. It's biomechanics. And once you understand it, you can access it any time you step onto your mat.
A Quick Tour of Your Pelvis Anatomy
Before you can find neutral, it helps to know what you're working with. Don't worry, we're going to keep it practical, and I'll ask you to put your hands on your own body in a minute.
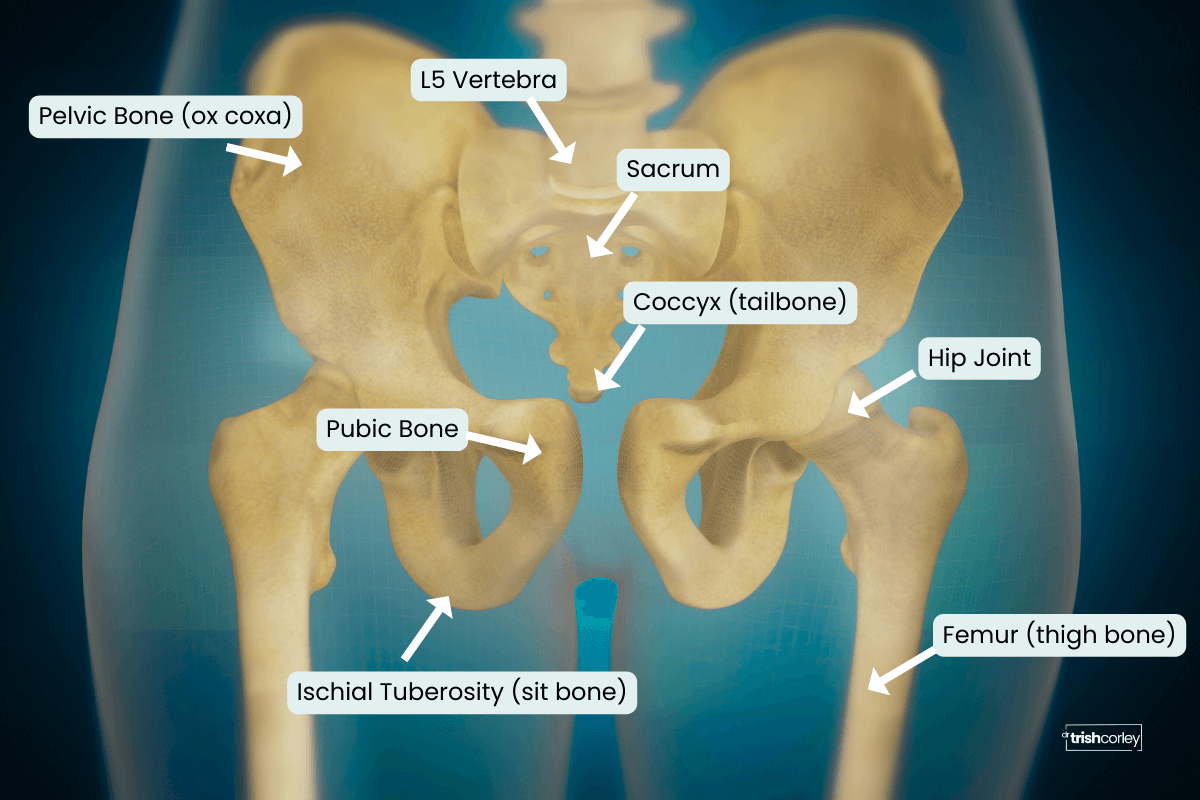
Your pelvis is made up of four key bones:
Two pelvic bones (called the ox coxa) that are large and shaped a bit like elephant ears. These are bigger than most people realize.
The sacrum, a triangle-shaped bone at the back of your pelvis, sitting between those two pelvic bones. The joints where the pelvic bones meet the sacrum are your sacroiliac (SI) joints.
The coccyx (tailbone), a small bone just below the sacrum.
It's also worth knowing that your femur (thigh bone) connects to your pelvis at the hip joint, and the last lumbar vertebra (L5) connects to the top of your sacrum. Your pelvis is truly the center of everything.
Now, there are a few landmarks on your pelvic bones that matter for finding neutral:
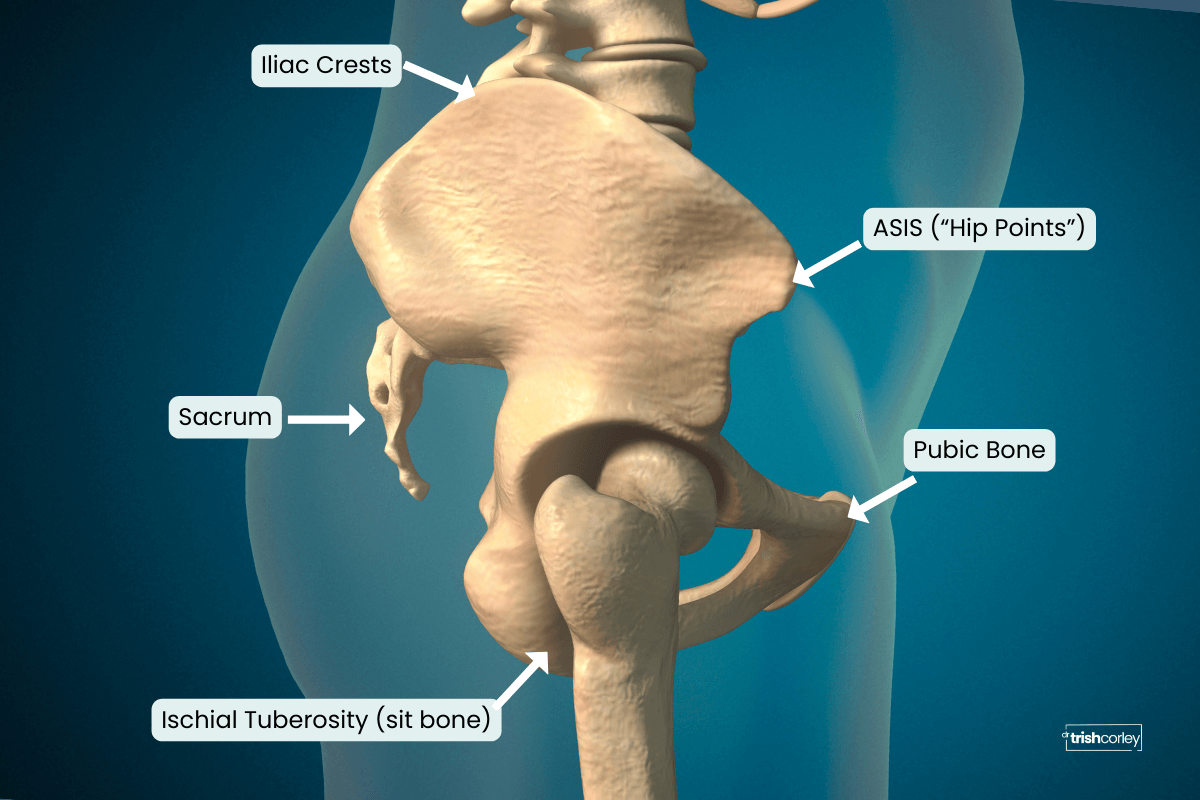
Your “hip points” as they are often referred to, are the bony bumps at the front of your pelvis, one on each side. Anatomically, they're called the ASIS (anterior superior iliac spine), but "hip points" seems to work well when I am teaching.
Your iliac crests are the top edges of your pelvic bones, the place where you probably put your hands when someone says "hands on your hips."
Your sit bones (ischial tuberosities) are the very bottom part of your pelvic bones. You might feel them when you sit on a hard surface.
Your pubic bones meet at the front of your pelvis, just above the genitals, at a spot called the pubic symphysis.
All of these landmarks are going to become your best friends for finding neutral pelvis.
Find the Bones on Your Own Body
Here's where it gets fun. Put the article down for a moment (okay, keep reading, but also use your hands) and explore.
Start with your hip points. Place your fingertips on the front of your pelvis, somewhere below your belly button. Feel for the two most prominent bony bumps, one on each side. Those are your hip points (ASIS). Can you find them?
Move to your iliac crests. Slide your hands up from your hip points to the very top of your pelvic bones. This is likely where you naturally place your hands when you stand with "hands on hips." Follow the curve of these bones around toward your back. Notice how they come closer together and meet a flatter surface. That's your sacrum. On each side of your pelvis, the large pelvic bone meets the sacrum. You might feel a bit of a groove there. That is the sacro-iliac joint. In other words, it is where the ilium (part of the big pelvic bone) connects to the sacrum.
Find your sit bones. If you're sitting on a firm chair right now, you might feel them pressing into the seat. You can also reach underneath while seated and feel for two rounded, bony prominences. Those are your ischial tuberosities (the fancy name for sit bones).
Locate your pubic bones. Feel for the bony prominence at the very front and bottom of your pelvis, just above the genitals. This is the pubic symphysis, where the two pelvic bones come together.
Take a moment to appreciate how large your pelvis actually is. Most people are surprised when they realize it's not just the hip points. It's this whole bowl-shaped structure that connects your upper body to your lower body.
The Two Key Movements: Anterior Tilt and Posterior Tilt
Now that you know where your pelvic bones are, let's talk about how they move.
Your SI joints have limited mobility (they're built for stability, not big movements). For practical purposes, you can think of your two pelvic bones, sacrum, and tailbone as moving together as one unit.
And that unit can tilt in two key directions:
Anterior tilt (forward tilt): Your hip points tip forward and down and your tailbone lifts. This is often associated with increased “arch” of the low back. Think of your pelvis as a bowl full of water. As you tip the top of it forward, you would pour the water out the front of a bowl.
Posterior tilt (backward tilt): Your hip points tip backward and up, your tailbone “tucks under”, and it’s likely that your low back loses its natural curve. In a posterior pelvic tilt, the water pours out of the back of the bowl.
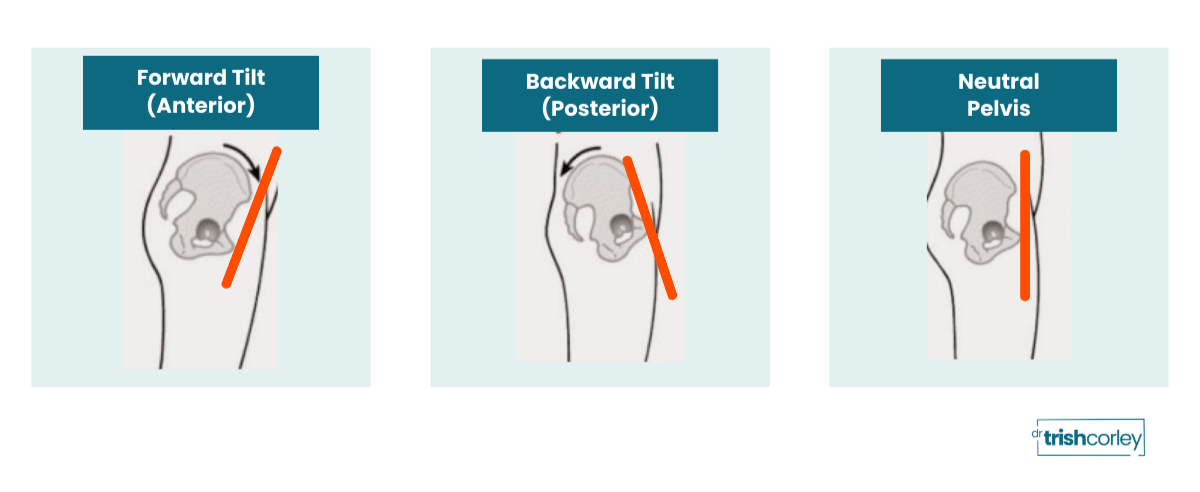
Neutral pelvis is the position between these two extremes. It's where your hip points and your pubic bone line up vertically when you're standing. Not tipping too far forward, not tucking too far back. Right in the middle.
Here's something important: not every pelvis is built the same. Neutral will look slightly different from person to person. But the pubic bone lining up vertically with the hip points (in standing) is a reliable starting point.
How to Find Your Neutral Pelvis, Step by Step
Ready to try it? Stand up in a comfortable position.
Step 1: Place your hands on your pelvis. Feel for your hip points in the front.
Step 2: Tilt your pelvis forward (anterior tilt) like you are pouring water out the front of your pelvic bowl. Then tilt it backward (posterior tilt) as if you are pouring the water out of the back of your pelvic bowl. Go back and forth a few times. You might feel your inner dancer come alive here, and that's perfectly fine. Embrace it!
Step 3: Gradually make the movements smaller, and stop when you feel like you're right in the middle of those two positions.
Step 4: Check your landmarks. Find your hip points and your pubic bone. Are they roughly in a vertical line? If so, you've likely found your neutral pelvis.
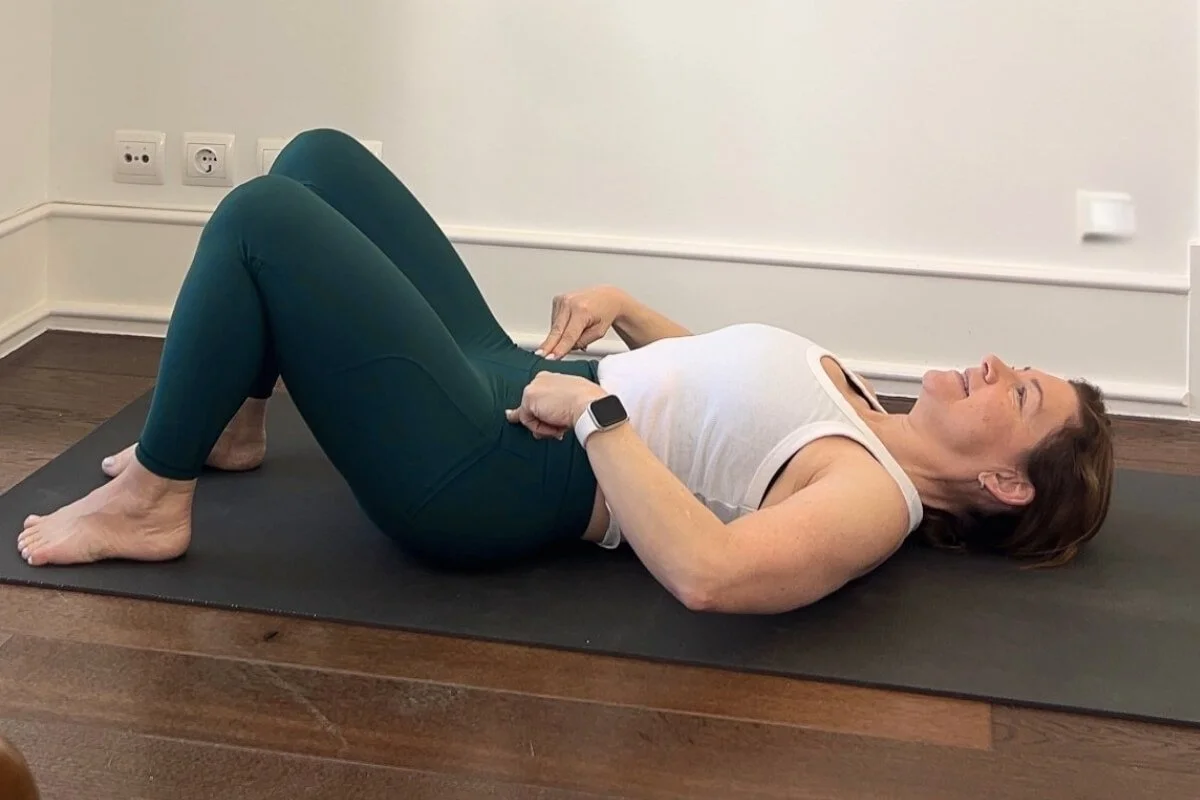
If you're having trouble, you're not alone. Some people actually find it easier to start lying on the floor with their knees bent (like you're setting up for bridge). In this position, you can rock your pelvis forward and back with less gravity to contend with, and it's often easier to feel the difference between the tilted positions and the neutral middle ground.
Once you have a sense of what neutral feels like, start exploring it in other positions. Can you find it in tabletop? In bird dog?
Be patient with yourself. This is a skill, and like any skill, it gets easier with practice.
Why Neutral Pelvis Makes Hard Yoga Postures Feel Easier (Starting with Plank)
Here's where things get exciting. When your pelvis is in neutral, your muscles are in their optimal position to generate force. Your “core “ can do its job. Your hip muscles fire efficiently. Your spine is supported. Without neutral pelvis, your body simply has to work harder to hold the posture. More muscular output is needed. This is why it can feel like you are struggling.
If you want to test this for yourself, try plank.
I think plank is one of the most challenging yoga postures to maintain a neutral pelvis in. It makes sense when you think about the physics. When you're standing, gravity pulls your pelvis straight down and it's relatively easy to find that neutral position. In plank, gravity is pulling your pelvis toward the floor, and your muscles have to “work much harder” to keep it from dropping into an anterior tilt. This is often what is happening when we see the classic “low back sag.”
Many people find plank exhausting. It's not that plank is inherently terrible. It's that without neutral pelvis, your body is fighting a losing battle against gravity.
A more empowering approach: Instead of just gritting your teeth and holding on, try checking in with your pelvis. Are your hip points and pubic bone in line? Or has your pelvis tipped forward, sending your belly toward the floor and increasing the forces on your low back?
A small shift toward neutral can change the entire experience. Your core activates more effectively. Your arms stop shaking as much. And instead of counting down the seconds until it's over, you might actually feel strong.
It's not always easy to find neutral alignment in a challenging posture like plank. And when you do, the posture starts to work for you instead of against you. That's what I call biomechanical magic. This is exactly why I built specific cues into my Balanced Posture Alignment framework that help you find and maintain neutral pelvis across different yoga postures. Understanding what neutral pelvis is gets you started. Having clear cues to access it is what makes it stick.

The Bottom Line
Neutral pelvis is actually one piece of a bigger picture. It's a foundational concept inside my Balanced Posture Alignment (BPA) framework, a system I developed from over 25 years of clinical physical therapy and yoga teaching. BPA includes 16 anatomy-informed cues that work across all yoga postures, and several of those cues are specifically designed to help you find and maintain neutral pelvis.
In this blog, you've learned what neutral pelvis is and how to find it on your own body. If you want to experience what BPA cues actually feel like in your body, my free guide Cue with Confidence is the perfect next step. It gives you three anatomy-informed cues you can start using right away.
Get Curious! Q&A
What does neutral pelvis mean in yoga?
Neutral pelvis is the position where your pelvis is neither tilting too far forward (anterior tilt) nor too far backward (posterior tilt). It's the balanced middle position where your hip points and pubic bone are roughly aligned vertically. In this position, your muscles work most efficiently and your spine is well supported.
How do I know if my pelvis is in neutral?
Stand comfortably and place your hands on the front of your pelvis. Locate your hip points (the bony bumps at the front, also called the ASIS) and your pubic bone. If these landmarks are roughly in a vertical line, your pelvis is close to neutral. It can also help to tilt your pelvis all the way forward and all the way back, then find the middle.
Why is neutral pelvis so hard to find in plank?
Gravity is the main reason. In plank, gravity pulls your pelvis toward the floor, which requires significantly more muscular effort to maintain neutral alignment than when you're standing upright. This is why plank feels so challenging, and why finding neutral in plank can completely change the experience.
Does everyone's neutral pelvis look the same?
No. Every pelvis is built a little differently, and neutral will vary from person to person. The hip points aligning with the pubic bone is a good general starting point, but your neutral pelvis is unique to your body. Hence I suggest that the hip points and pubic bone be “roughly vertical”. For many the pubic bone may still be a bit forward of the hip points.
Can neutral pelvis help with back pain?
When the pelvis is out of its neutral position for extended periods, it can place additional stress on the muscles, joints, and ligaments of the low back. While neutral pelvis isn't a cure-all, learning to find and maintain it during yoga and daily activities can contribute to reduced back discomfort and improved posture over time. Ultimately, we need to be able to move the pelvic fluidly; to access anterior, posterior, and neutral pelvis as we move in and out of different positions and activities. If you're experiencing persistent pain, working with a physical therapist or qualified professional is always a good idea.
Go Deeper with Anatomy
This is just one piece of the puzzle. Understanding neutral pelvis is a perfect example of how a little anatomy knowledge can completely shift your experience on the mat.
If you want to see how anatomy-informed alignment works in action, remember you can grab my free guide called Cue with Confidence.It's a preview of my Balanced Posture Alignment framework and shows you how one set of simple, anatomy-based cues can create stability and grounding in every yoga posture.
Want to go even deeper into anatomy that actually makes sense for yoga? My Enlightened Anatomy Course covers the pelvis (and so much more) in a way that's practical, accessible, and rooted in real science.
About the Author
Dr. Trish Corley is a Doctor of Physical Therapy (Physiotherapy) and yoga teacher trainer with over two decades of clinical experience. She helps yoga teachers learn anatomy, give clear cues, and create classes their students love. Based in Lisbon, Portugal, she leads the Enlightened Anatomy Course, the Elevate Your Impact Mentorship, and the Power to Lead 200-Hour YTT.