How to Learn Yoga Anatomy (Without the Overwhelm)
I've taken a lot of yoga teacher trainings. My first one had an anatomy module that was basically a list. Muscles, what they do, repeat. No connection to yoga postures, no practical application, nothing you could actually use in a class. I was bored. I was annoyed. And that session, of all things, is what inspired the work I do today. I knew there had to be a better way for people to learn yoga anatomy.
Later trainings took a different approach entirely. We learned cues. We practiced teaching them. For many teachers, this was more useful. But when I started talking to colleagues after those trainings, a pattern emerged: teachers felt confident selecting cues in real time, but they still didn't understand the anatomy behind them.
That gap is exactly why I created the Balanced Posture Alignment framework.
Learning yoga anatomy doesn't have to start with anatomy. And for most yoga teachers, it shouldn't.
In This Article:
Why traditional anatomy learning doesn't work for yoga teachers
The key mindset shift that changes everything
The 6-step method for learning anatomy through your body and your teaching
How to start applying this today
Why Traditional Anatomy Learning Doesn't Work for Yoga Teachers
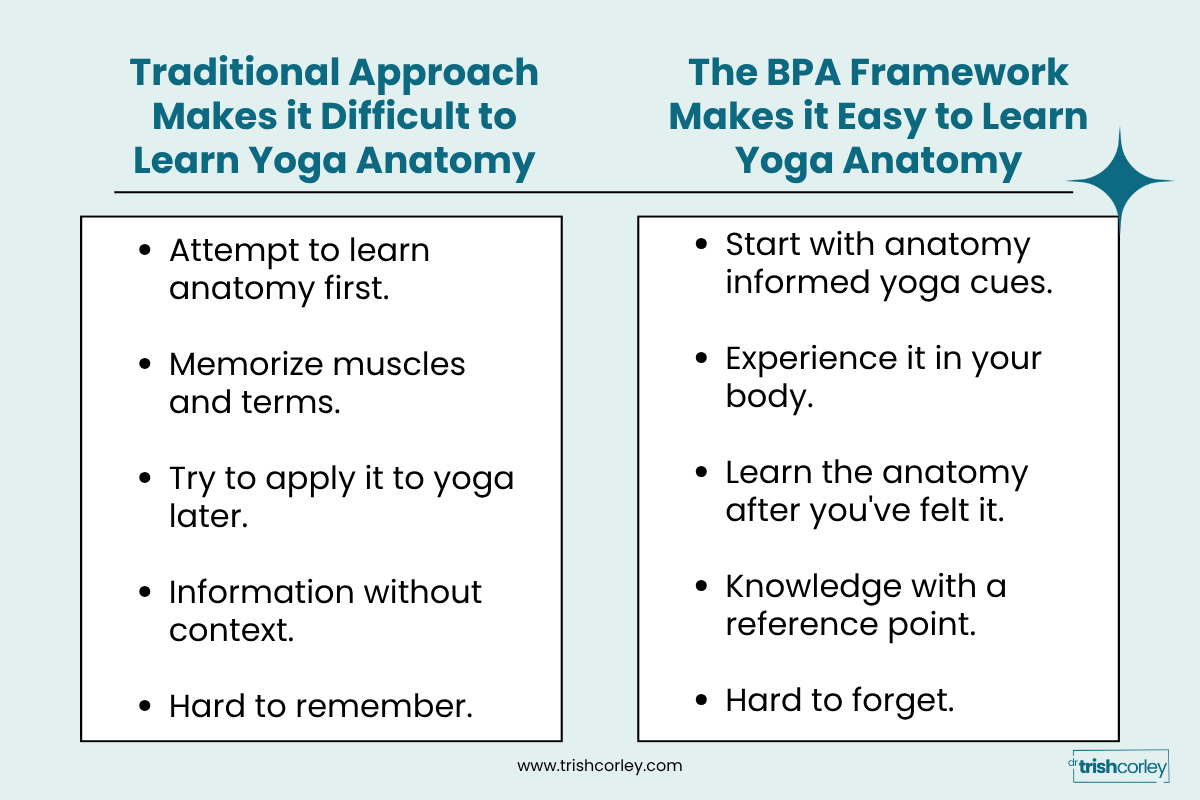
Most yoga teacher trainings cover anatomy one of two ways.
The first: lists of anatomical terms. Think muscles, joint types, ranges of motion, maybe some Latin you'll never use again. It's dense, it's disconnected from practice, and it's almost impossible to apply when you're standing in front of a room full of students. You leave knowing what the gluteus maximus is. You have no idea what to do with that information in warrior two.
The second: a library of cues. You practice them, you memorize them, and you feel reasonably confident using them in class. Until a student asks you why a cue works. Or it doesn't work for someone in your class. And you realize you've been repeating instructions you don't fully understand.
Neither approach gives you what you actually need: anatomy knowledge you can see, feel, and apply in real time.
Here's what I've come to understand after over two decades of clinical practice and more than a decade of teaching anatomy to yoga teachers. The issue isn't your capacity to learn anatomy. It's the order in which you're being asked to learn it. If this sounds familiar, you're not alone. Read more about why yoga anatomy feels so hard for most teachers.
The Mindset Shift That Changes Everything
What if you started with the cue instead of the anatomy?
This is the core idea behind the Balanced Posture Alignment (BPA) framework. Instead of learning anatomy first and then trying to figure out how to apply it, you start with a cue that speaks directly to the body. You practice it. You feel it. And then you learn the anatomy that supports it.
By the time you encounter the anatomical concepts, you've already experienced them. The information lands differently because your body already knows what you're talking about.
Think of it like learning to ride a bike. If someone hands you a manual on the physics of balance and momentum before you've ever sat on a bike, that information means very little. But if you've already wobbled down the street a few times, suddenly the physics makes sense. You have a reference point. The knowledge has somewhere to go.
Learning yoga anatomy works the same way. Experience first, understanding second. That sequence changes everything.
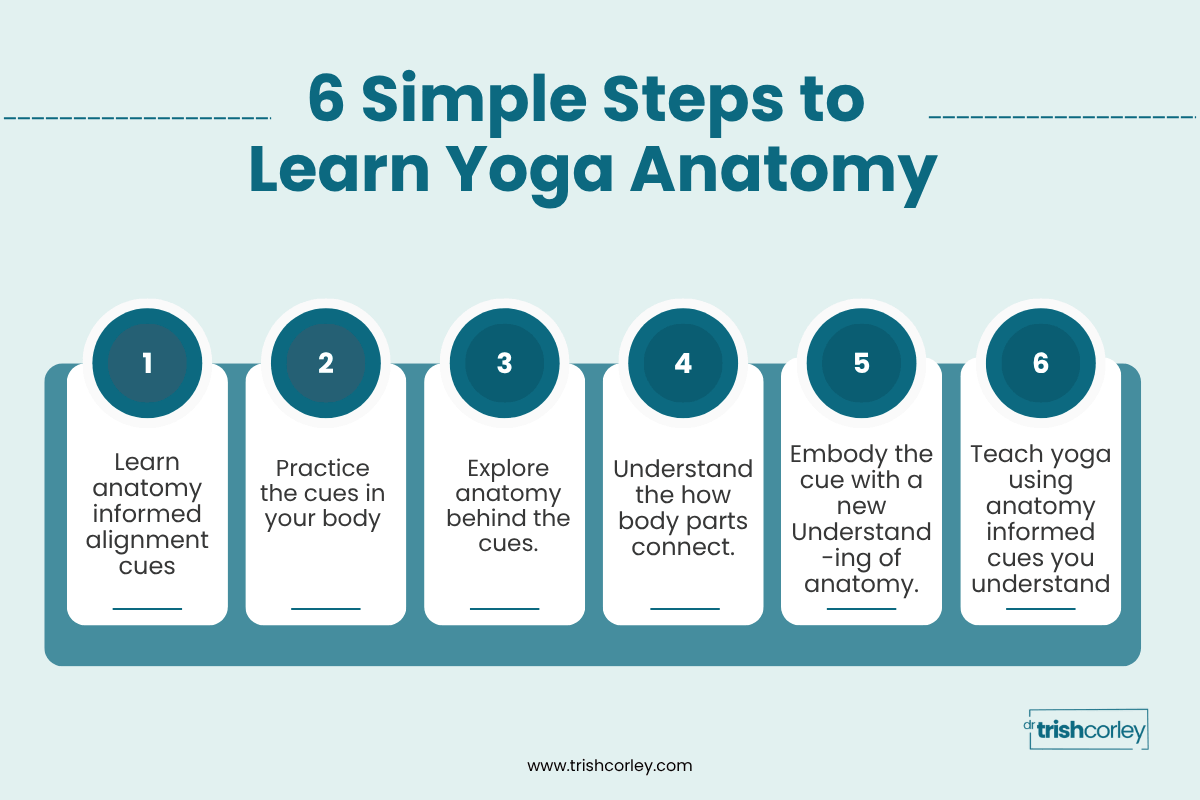
The 6-Step Method for Learning Yoga Anatomy
This is the process at the heart of the Enlightened Anatomy Course and the foundation of everything I teach. It starts on your mat, not in a textbook.
Step 1: Learn anatomy informed alignment cues.
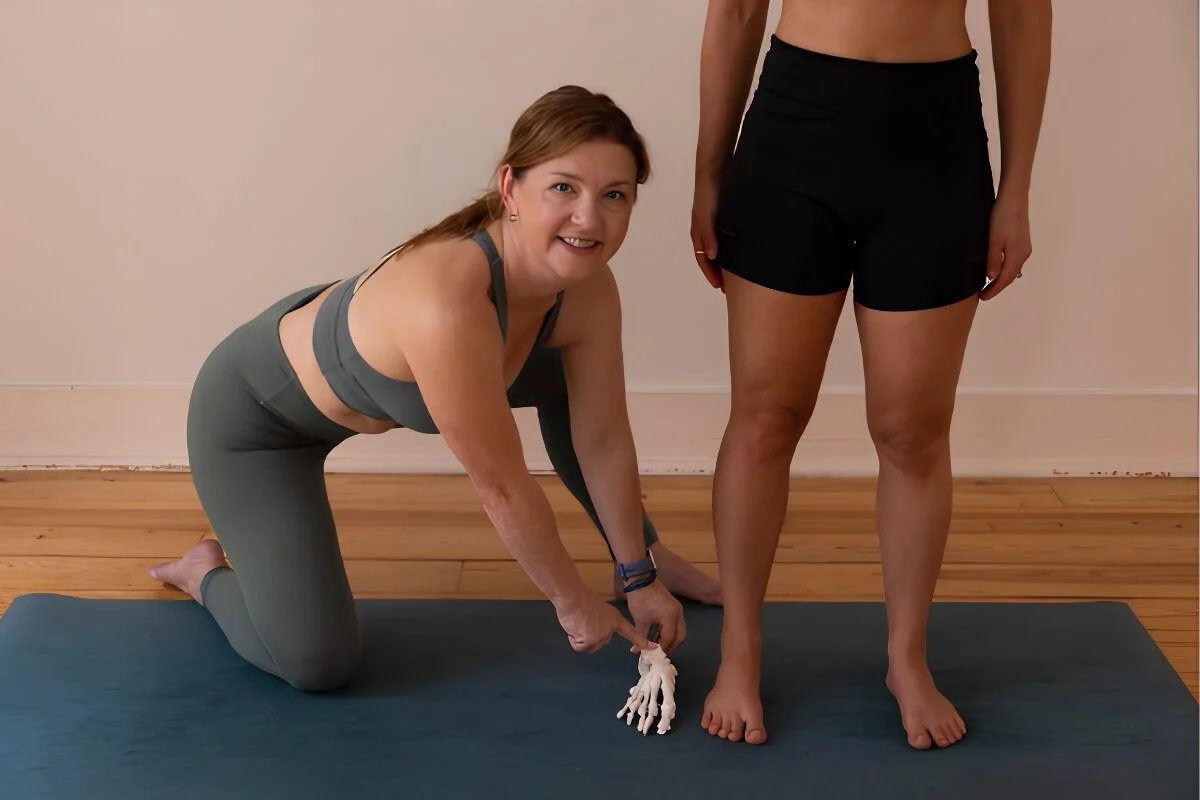
Start with a cue that speaks directly to the body. Something like "stretch your toes out as far as you can." It's simple, it's actionable, and your students know exactly what to do when they hear it. You don't need to understand the anatomy yet. Just learn the cue.
Step 2: Practice the cues in your own body.
Get on your mat. Start in Tadasana and put the cue into your own body. Feel what happens. Look at what happens. Then take it into other postures and notice how the same cue creates different sensations in different positions. This is where learning begins, before a single anatomical term is introduced.
Step 3: Explore the anatomy behind the cues.
Now you're ready for the anatomy. And because you've already felt the cue in your body, the information has somewhere to land. You're not memorizing abstract facts. You're putting names to something you've already experienced. Keep it simple here: major bones, major joints, and in some cases the primary muscles involved. Nothing more than you need.
Step 4: Understand the how body parts connect.
The body doesn't work in isolated parts, and neither should your understanding of it. This step is about seeing how the area you're studying connects to what you've already learned. The foot connects to the ankle. The ankle connects to the knee. One cue can create a chain reaction through the entire body. Understanding those connections is what takes your teaching from competent to confident.
Step 5: Embody the cues with your new understanding of anatomy.
Come back to your mat. Practice the cue again, this time with your anatomical knowledge active. Visualize what's happening inside your body as you move. Feel the bones, the joints, the muscles you now know by name. This is where the "aha" moments happen. Teachers in my courses often say things like "so THAT'S what's been happening in my hip this whole time."
Step 6: .Teach yoga using anatomy informed cues you understand.
This is where everything comes together. Teach the cue to someone else. Watch their body as you cue. Observe what changes and what doesn't. This is the moment you stop repeating instructions and start teaching anatomy. You're no longer guessing. You're watching, understanding, and responding to what you actually see.
If you want to go further with cueing, this blog is a good next read: Effective Yoga Cues: The 3-Part Formula for Clear, Confident Teaching
How to Start Applying This Way of Learning Yoga Anatomy Today
Start with one cue.
Pick something simple. "Stretch your toes out as far as you can" is a good place to start because the results are immediate and visible. Stand in Tadasana and put that cue into your own body. Look at your feet. Feel what shifts. Then take it into downward dog, into warrior two, into whatever posture you're teaching this week.
Notice what changes when you use it. Notice what doesn't. That observation is the beginning of anatomy learning, and it's available to you right now, on your mat.
When you're ready to go deeper, the Enlightened Anatomy Course gives you the complete framework. All 6 steps, all 16 anatomy-informed cues, applied across every major area of the body. You'll finish the course understanding not just what to cue but why it works — and you'll be able to use that understanding in any posture, with any student.
The Bottom Line
Learning yoga anatomy doesn't have to feel like studying for a medical exam. The reason it has felt hard for so many teachers isn't a lack of intelligence or dedication. It's a sequencing problem. When you start with cues, experience the anatomy in your own body, and then bring that understanding into your teaching, the information sticks. You stop guessing and start seeing. That shift, from repeating cues to understanding them, is what makes the difference between a teacher who feels uncertain and one who teaches with genuine confidence.
Get Curious! Q&A
Can I learn yoga anatomy without a medical background?
Yes, and that's exactly who this framework was designed for. The BPA framework was created specifically for yoga teachers, not medical students. You don't need any prior anatomy knowledge to begin. The 6-step method starts with what you already know how to do — practice and teach yoga postures — and builds anatomical understanding from there. Many of the teachers who have gone through the Enlightened Anatomy Course had no clinical background whatsoever and finished the course teaching with real confidence.
How long does it take to learn yoga anatomy?
With the right framework, you can build a solid, practical foundation in as little as 8 hours. That's the length of the Enlightened Anatomy Course. This isn't about memorizing every muscle and bone in the body. It's about learning the essential anatomy that directly affects how your students move, and being able to apply it immediately in your teaching.
What is the Balanced Posture Alignment framework?
The Balanced Posture Alignment (BPA) framework is a systematic approach to learning anatomy developed by Dr. Trish Corley, a Doctor of Physical Therapy and yoga teacher trainer. It centers on 16 anatomy-informed alignment cues that work across every yoga posture. Instead of starting with anatomy and trying to apply it to yoga, BPA starts with the cues and builds anatomical understanding from lived experience in the body.
Do I need to take a yoga anatomy course after my 200-hour training?
Most 200-hour yoga teacher trainings cover anatomy superficially, meeting minimum Yoga Alliance requirements without giving teachers the practical knowledge they need in a real class. If you've ever felt uncertain when a student asks an anatomy question, given a cue without fully understanding why it works, or worried about cueing safely for a student with an injury, additional anatomy education will make a meaningful difference to your teaching.
What is the best way to learn yoga anatomy as a yoga teacher?
Start with cues, not textbooks. The most effective approach for yoga teachers is one that connects anatomical knowledge to real teaching situations from the very beginning. Learning the cue, experiencing it in your own body, understanding the anatomy behind it, and then teaching it to someone else creates a learning loop that makes the information stick. A structured course that follows this sequence, like the Enlightened Anatomy Course, gives you the complete framework in a format designed for how yoga teachers actually learn.
Go Deeper with Learning Yoga Anatomy.
The Enlightened Anatomy Course gives you the complete Balanced Posture Alignment framework — all 16 anatomy-informed cues, applied across every major area of the body, in a structured 6-step learning process designed specifically for yoga teachers. No medical background required. No overwhelming textbooks. Just practical anatomy knowledge you can use in your next class.
Enroll in the Enlightened Anatomy Course →
About the Author
Dr. Trish Corley is a Doctor of Physical Therapy (Physiotherapy) and yoga teacher trainer with over two decades of clinical experience. She helps yoga teachers learn anatomy, give clear cues, and create classes their students love. Based in Lisbon, Portugal, she leads the Enlightened Anatomy Course, the Elevate Your Impact Mentorship, and the Power to Lead 200-Hour YTT.